SpringBoot+Vue3+SSE实现实时消息语音播报
1、前言
有这样一个业务场景,比如有一个后台管理系统,用来监听订单的更新,一有新的订单,就立即发送消息提醒系统用户,进行查看订单,最经典的案例就是美团或饿了么的商家运营后台,网上来新的订单后,立即会进行语音播报:“您有新的外卖订单,请及时查看!”,那么,今天这篇文章来实现一个类似于这样的功能,首先,框架方面选择的是SpringBoot+Vue3进行开发,而消息实时推送选择的是SSE技术(Server-Sent Events),它和WebSocket都是网络通讯技术,但是有一些异同之处。
2、什么是SSE
可能有小伙伴会说SringBoot和vue我听说过,WebSocket也了解过,这个SSE是什么东西?
下面我来解释一下SSE技术是干什么的。
SSE(Server-Sent Events,服务器发送事件)是一种网络通信技术,允许服务器向客户端推送信息,而不需要客户端显式地请求。这项技术通常用于需要实时更新或流式传输数据的场景,例如股票价格更新、社交网络通知、实时消息传递等。
以下是SSE技术的一些特点:
单向通信:SSE提供的是从服务器到客户端的单向通信。服务器可以不断地将数据推送到客户端,但客户端不能通过同一个连接发送数据到服务器。
基于HTTP:SSE使用标准的HTTP协议,并通过长连接保持通信。这意味着它不需要任何额外的协议或复杂配置,可以很容易地通过现有的Web基础设施工作。
事件格式:服务器发送的数据是以事件的形式封装的。每个事件包括类型和数据字段,其中数据字段可以包含任何序列化的数据,通常是文本,也可以是JSON格式的数据。
自动重连:如果服务器或网络发生故障导致连接断开,SSE规范要求客户端自动尝试重新连接。
简单易用:客户端通过JavaScript中的EventSource接口可以很容易地使用SSE。创建一个EventSource实例,并指定服务器的URL,就可以开始接收事件。
2.1、与WebSocket有什么异同?
SSE(Server-Sent Events)和WebSocket都是实现服务器与客户端之间实时通信的技术,但它们在通信模式、使用场景和实现细节上存在一些差异:
(1)通信模式方面区别:
SSE:
单向通信:仅支持从服务器到客户端的数据推送。
基于HTTP:使用HTTP协议,可以穿过大多数防火墙。
保持连接:客户端与服务器之间的连接保持开放,服务器可以不断发送数据。
WebSocket:
双向通信:支持客户端和服务器之间的全双工通信,即客户端和服务器都可以随时发送消息。
协议升级:最初通过HTTP握手建立连接,然后升级到WebSocket协议,创建持久的TCP连接。
实时性:提供真正的实时通信,延迟更低。
(2)使用场景方面区别:
SSE:
适用于只需要服务器向客户端推送数据的场景,如新闻推送、实时更新等。
适合处理跨域资源共享(CORS)。
WebSocket:
适用于需要双向实时通信的应用,如在线聊天室、多人游戏、实时交易系统等。
适合需要低延迟和高频消息交换的场景。
(3)实现细节方面区别:
SSE:
自动重连:如果连接断开,浏览器会自动尝试重新连接。
简单性:API简单,易于实现。
数据格式:发送的数据通常是文本格式,可以是JSON。
WebSocket:
自定义协议:WebSocket使用自定义的协议,不是基于HTTP的。
连接维护:需要手动处理连接的维护,如重连逻辑。
数据格式:可以发送文本和二进制数据。
(4)兼容性和复杂性方面区别:
SSE:
兼容性较好:大多数现代浏览器都支持SSE。
实现简单:服务器端发送事件流,客户端监听事件。
WebSocket:
兼容性较好:所有现代浏览器都支持WebSocket。
实现复杂:需要服务器和客户端都实现WebSocket协议,可能需要第三方库支持。
总结来说,SSE和WebSocket的主要区别在于通信方向、协议类型、使用场景和实现复杂度。选择哪种技术取决于具体的应用需求。如果只需要单向的数据流,SSE是一个简单有效的选择;如果需要双向实时通信,WebSocket则更为合适。
3、代码实现
3.1、前置代码
SSE技术需要springboot-web的依赖,本文章ORM框架使用了mybatis-plus,数据库用的是mysql5.7,lombok快速生成set/get方法。
        <dependency>
            <groupId>org.springframework.boot</groupId>
            <artifactId>spring-boot-starter-web</artifactId>
        </dependency>
        <dependency>
            <groupId>org.mybatis.spring.boot</groupId>
            <artifactId>mybatis-spring-boot-starter</artifactId>
            <version>3.0.3</version>
        </dependency>
       <dependency>
            <groupId>com.mysql</groupId>
            <artifactId>mysql-connector-j</artifactId>
            <scope>runtime</scope>
        </dependency>
        <dependency>
            <groupId>org.projectlombok</groupId>
            <artifactId>lombok</artifactId>
            <optional>true</optional>
        </dependency>
        <dependency>
            <groupId>com.baomidou</groupId>
            <artifactId>mybatis-plus-boot-starter</artifactId>
            <version>${mybatis-plus.version}</version>
        </dependency>
通用BaseEntitiy类,这个类是存放一些各个表都通用的属性,子类只属于继承即可
@Data
public abstract class BaseEntity<T> implements Serializable {
    private static final long serialVersionUID = 1L;
    /**
     * 主键ID
     */
    @TableId(type = IdType.ASSIGN_ID)
    @JsonSerialize(using = ToStringSerializer.class)
    private Long id;

    /**
     * 创建时间,使用MyBatis-Plus的自动填充功能
     */
    @TableField(value = "create_time", fill = FieldFill.INSERT)
    @JsonFormat(pattern = "yyyy-MM-dd HH:mm:ss", timezone = "GMT+8")
    private Date createTime;

    /**
     * 更新时间,使用MyBatis-Plus的自动填充功能
     */
    @TableField(value = "update_time", fill = FieldFill.INSERT_UPDATE)
    @JsonFormat(pattern = "yyyy-MM-dd HH:mm:ss", timezone = "GMT+8")
    private Date updateTime;

    @TableField(value = "create_by", fill = FieldFill.INSERT)
    private Long createBy;

    @TableField(value = "update_by", fill = FieldFill.INSERT_UPDATE)
    private Long updateBy;
}
添加mybatis-plus自动填充通用属性配置类
/**
 * mybatis-plus拦截器,自动填充相关字段
 **/
@Component
public class MyMetaObjectHandler implements MetaObjectHandler {

    @Override
    public void insertFill(MetaObject metaObject) {
        this.strictInsertFill(metaObject, "createTime", Date.class, new Date());
        this.strictInsertFill(metaObject, "updateTime", Date.class, new Date());
        this.strictInsertFill(metaObject, "createBy", Long.class, UserContext.getCurrentUser().getId());
        this.strictInsertFill(metaObject, "updateBy", Long.class, UserContext.getCurrentUser().getId());
    }

    @Override
    public void updateFill(MetaObject metaObject) {
        this.strictUpdateFill(metaObject, "updateTime", Date.class, new Date());
        this.strictInsertFill(metaObject, "updateBy", Long.class, UserContext.getCurrentUser().getId());
    }
}
3.2、SSE相关代码
创建SseController
@RestController
public class SseController {

    @Autowired
    private SseService sseService;
    //客户端用户连接服务器方法
    @GetMapping("/sse/{userId}")
    public SseEmitter streamSseMvc(@PathVariable Long userId) {
        return  sseService.streamSseMvc(userId);
    }

}
创建service接口
public interface SseService {

    /**
     * 连接方法
     * @param userId
     * @return
     */
    SseEmitter streamSseMvc(Long userId);

    /**
     * 制定userId发送消息
     * @param userId
     * @param message
     */
    void sendMessage(Long userId, String message);
}
创建service实现类
@Service
public class SseServiceImpl implements SseService {
    //创建线程安全的map,维护每个客户端的sseEmitter对象
    private ConcurrentHashMap<Long, SseEmitter> userEmitters = new ConcurrentHashMap<>();

    @Override
    public SseEmitter streamSseMvc(Long userId) {
        //设置监听器永不过期,一直监听消息
        SseEmitter emitter = new SseEmitter(0L);
        userEmitters.put(userId, emitter);

        emitter.onCompletion(() -> userEmitters.remove(userId, emitter));
        emitter.onTimeout(() -> userEmitters.remove(userId, emitter));
        emitter.onError((e) -> userEmitters.remove(userId, emitter));

        return emitter;
    }

    @Override
    public void sendMessage(Long userId, String message) {
        SseEmitter emitter = userEmitters.get(userId);
        if (emitter != null) {
            try {
                emitter.send(SseEmitter.event().name("message").data(message));
            } catch (IOException e) {
                userEmitters.remove(userId, emitter);
            }
        }
    }
}
3.3、消息类相关代码
有了sse的service还不够,因为我们需要创建一个存储notify的表,也就是消息类
创建表结构
CREATE TABLE `system_notify` (
  `id` bigint NOT NULL COMMENT '主键',
  `title` varchar(255) DEFAULT NULL COMMENT '消息标题',
  `level` varchar(2) DEFAULT NULL COMMENT '消息级别',
  `content` varchar(500) DEFAULT NULL COMMENT '消息内容',
  `to_user` bigint DEFAULT NULL COMMENT '接收人',
  `to_role` bigint DEFAULT NULL COMMENT '接收角色',
  `create_time` datetime DEFAULT NULL COMMENT '创建时间',
  `state` varchar(255) CHARACTER DEFAULT NULL COMMENT '消息状态  01   未读   02   已确认  03   已忽略',
  `create_by` bigint DEFAULT NULL COMMENT '创建者',
  `update_by` bigint DEFAULT NULL COMMENT '更新者',
  `update_time` datetime DEFAULT NULL COMMENT '更新时间',
  PRIMARY KEY (`id`)
) ENGINE=InnoDB;
/**
 * 消息类
 */
@Data
@TableName("system_notify")
public class Notify extends BaseEntity<Notify> {
    /**
     * 消息标题
     */
    @TableField("title")
    private String title;
    /**
     * 消息内容
     */
    @TableField("content")
    private String content;
    /**
     * 消息级别
     */
    @TableField("level")
    private String level;
    /**
     * 发送至用户id
     */
    @TableField("to_user")
    private Long toUser;
    /**
     * 发送至用户角色id
     */
    @TableField("to_role")
    private Long toRole;

    /**
     * 消息状态
     */
    @TableField("state")
    private String state;
}
Notify的controller控制层
@RestController
@RequestMapping("/notify")
public class NotifyController {
    @Autowired
    private NotifyService notifyService;

    @RequestMapping("findAllNotifyByUser/{userId}")
    public Result<List<Notify>> findAllNotifyByUser(@PathVariable Long userId) {
        List<Notify> notifyList = notifyService.findAllNotifyByUser(userId);
        return Result.success(notifyList);
    }

    @RequestMapping("addNotify")
    public Result<String> addNotify(@RequestBody Notify notify) {
        notifyService.addNotify(notify);
        return Result.success();
    }

}
Notify的service接口
public interface NotifyService {
    void addNotify(Notify notify);

    List<Notify> findAllNotifyByUser(Long userId);
}
Mapper接口
public interface NotifyMapper extends BaseMapper<Notify> {
}
service实现类
@Service
public class NotifyServiceImpl implements NotifyService {
    @Autowired
    private NotifyMapper notifyMapper;
    @Autowired
    private SseService sseService;

    /**
     * 添加消息
     * @param notify
     */
    @Override
    public void addNotify(Notify notify) {
        //添加消息
        notifyMapper.insert(notify);
        //发送sse
        sseService.sendMessage(notify.getToUser(), notify.getContent());
    }

    /**
     * 查询用户相关消息
     * @param userId
     * @return
     */
    @Override
    public List<Notify> findAllNotifyByUser(Long userId) {
        return notifyMapper.selectList(new LambdaQueryWrapper<Notify>().eq(Notify::getToUser, userId).eq(Notify::getState, NotifyState.n1.getCode()));
    }
}
3.4 、前端代码


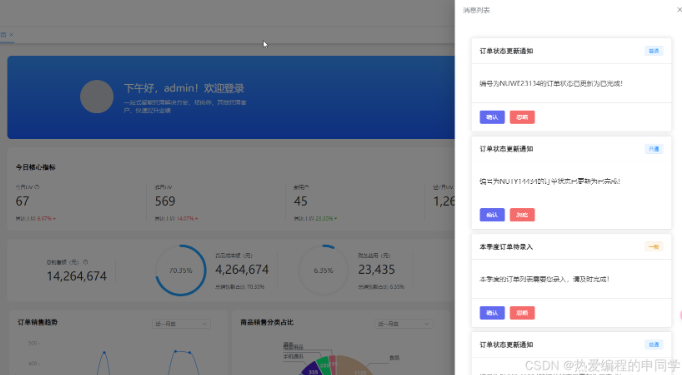
这是小铃铛和消息列表的前端代码
<div class="notify-btn" @click="showNotifyBox">
<el-badge :value="notifyCount" :max="99" class="item">
<i class="iconfont notify"></i>
</el-badge>
</div>
<el-drawer v-model="showNotify" title="消息列表">
<div class="notify-drawer">
<el-card style="width: 480px" v-for="(item,index) in notifyData" :key="index" class="notify-card">
<template #header>
<div class="card-header">
<span class="notify-title">{{ item.title }}</span>
<el-tag type="primary" v-if="item.level === '01'">普通</el-tag>
<el-tag type="warning" v-if="item.level === '02'">一般</el-tag>
<el-tag type="danger" v-if="item.level === '03'">紧急</el-tag>
</div>
</template>
<p class="text item">{{ item.content }}</p>
<template #footer>
<el-button color="#626aef">确认</el-button>
<el-button type="danger">忽略</el-button>
</template>
</el-card>
</div>
</el-drawer>
const showNotifyBox = () => {
  showNotify.value = true;
}
//初始化一个ref的消息数组,存放消息
const notifyData = ref([])
const findAllNotifyByUser = (userId: String) => {
  $http.post('/notify/findAllNotifyByUser/' + userId).then((data) => {
    notifyData.value = data;
    //计算消息的个数
    notifyCount.value = data.length;
  })
}
let eventSource = null;
const subscribeToSSE = () => {
  eventSource = new EventSource('http://localhost:8080/sse/' + userInfo.userId);
  eventSource.onmessage = (event) => {
    //语音播报
    speak(event.data);
    //重新查询消息
    findAllNotifyByUser(userInfo.userId);
  };
  eventSource.onerror = (error) => {
    console.error('SSE error:', error);
  };
};
//使用HTML5 Api 进行语音播报服务器推送的消息
const speak = (text) => {
  if ('speechSynthesis' in window) {
    const utterance = new SpeechSynthesisUtterance(text);
    utterance.lang = 'zh-CN';
    window.speechSynthesis.speak(utterance);
  } else {
    alert('您的浏览器不支持语音合成');
  }
}
onMounted(() => {
  //页面渲染完后进行连接sse
  subscribeToSSE();
  //根据userId 进行查询相关消息,这里的userInfo我是从pinia中取出的,根据自己业务进行取值
  findAllNotifyByUser(userInfo.userId);
})
onUnmounted(() => eventSource.close());
4、实机演示
好啦,下面的视频是我进行实机演示的效果,大家可以参考一下。


